
A Step-by-Step Guide to Construction Procurement
Your jobsite runs at the speed of your materials. Learn below how to go from drawings on paper to materials in hand on site…
Procurement may happen behind the scenes—but it runs the show. Without it, there are no materials, no crews moving, and no progress on site.
Still, despite its importance, procurement is often under-documented, misunderstood, and vulnerable to delays, cost overruns, and miscommunication.
Whether you're a general contractor, subcontractor, or project manager, understanding procurement in detail can mean the difference between a job that flows and one that falls apart.
This guide will take you step-by-step through the entire construction procurement process, highlighting where most teams get stuck—and how to do it right.

🔧 Step 1: Define Scope and Material Requirements
Before anything can be purchased, you need a clear definition of what you’re buying, how much, and when it’s needed. That starts with:
Drawings and Specifications – These documents outline what materials are approved for the job.
Quantity Takeoffs – Accurate material counts must be extracted from drawings, often using estimating software or manual reviews.
Schedule Alignment – Know when each item is required onsite based on your project schedule, not just when it can ship.
🧠 Why this matters: Ordering too early wastes space and risks damage. Ordering too late stalls work. Precision here is key.
📩 Step 2: Create and Send RFQs (Request for Quote)
Once scope and quantities are locked in, it’s time to engage vendors.
An RFQ is a document sent to suppliers asking for pricing, lead times, availability, and payment terms for specific items.
Best practices for RFQs:
Include full specs (size, finish, quantity, delivery date)
Send to at least 3 qualified vendors
Ask for delivery logistics (do they unload? offer staging?)
Include a response deadline to stay on schedule
🛠 Reality check: Most contractors still email RFQs manually—or worse, call vendors one by one. It works, but it wastes serious time and leads to inconsistent results.
🧾 Step 3: Receive and Compare Quotes
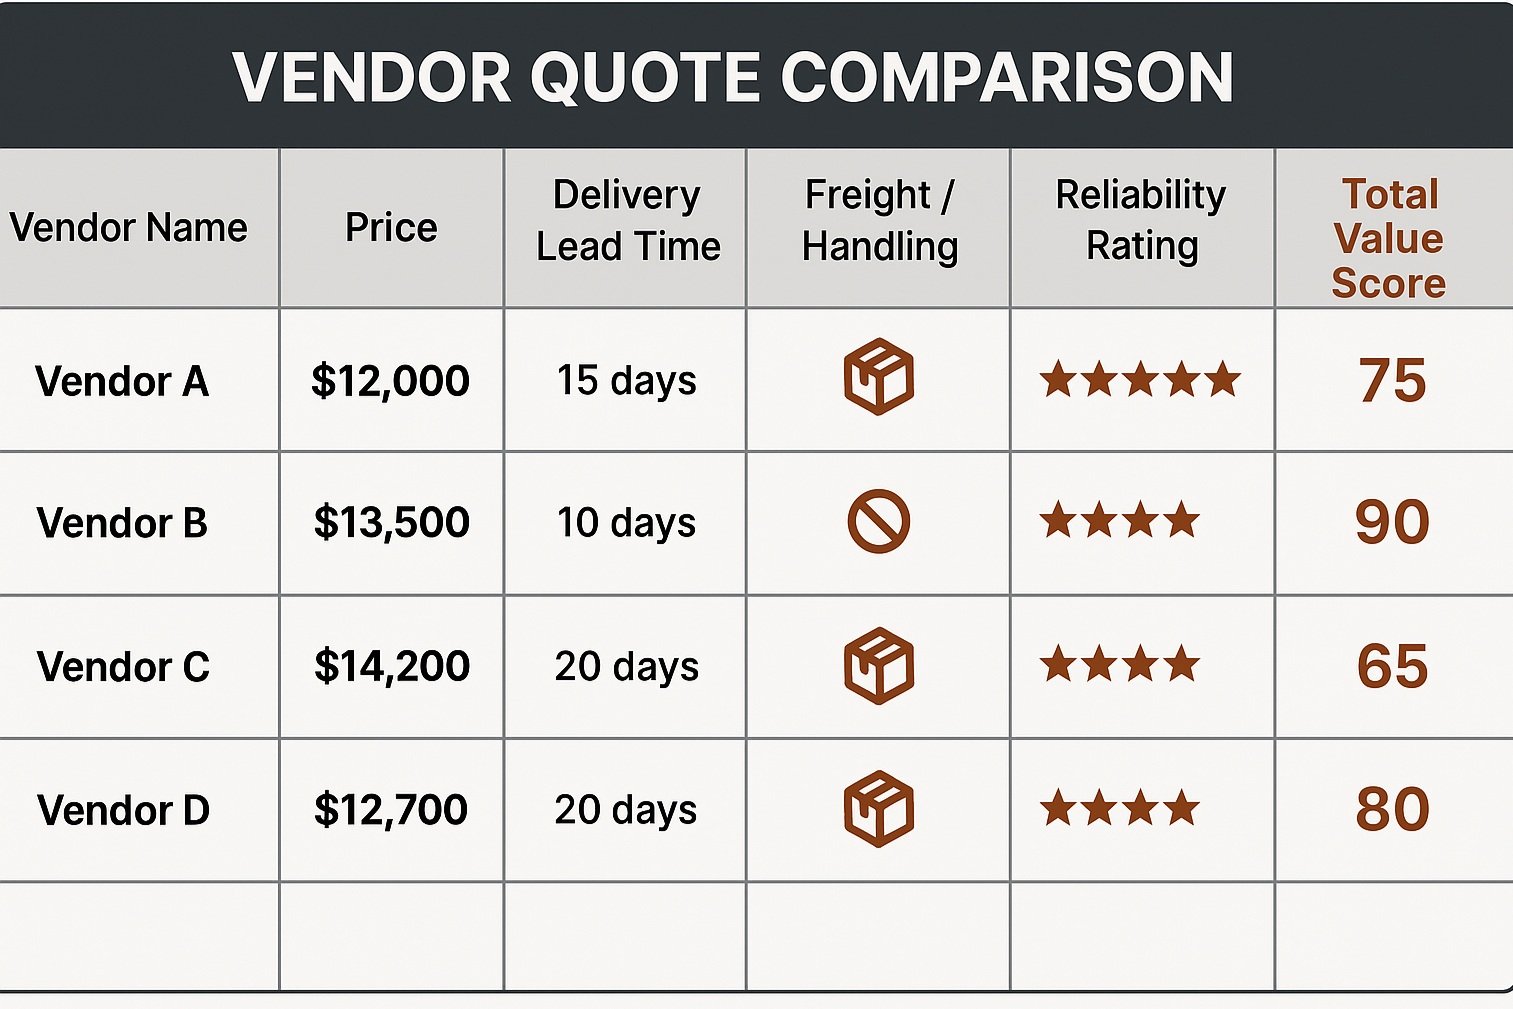
When quotes come in, this is your moment to evaluate more than just the numbers. Here’s what to look for:
Price per unit
Delivery timeframes
Shipping or handling fees
Substitution suggestions (value engineering)
Vendor reliability (based on past performance)
📋 Pro tip: Create a quote comparison matrix to line everything up visually. Track it by item, vendor, and lead time so you can make informed decisions.
⚠️ Red flag: The lowest bid isn’t always the best. Late deliveries or poor-quality materials will cost you more in the long run.
📝 Step 4: Issue a Purchase Order (PO)
A purchase order is a formal document confirming your intent to buy from the vendor under the quoted terms.
A complete PO should include:
Material descriptions and quantities
Agreed pricing and payment terms
Delivery address, date, and contact info
Any project-specific conditions (e.g., staging windows, jobsite instructions)
📌 Pro tip: Treat the PO like a contract. If issues arise later, this is your protection.
Internally, the PO should also be:
Approved by your office or project team
Filed in a centralized system for tracking
Linked to project budgets and vendor histories
🚛 Step 5: Schedule, Receive, and Verify Delivery
A lot can go wrong between the time a PO is issued and when materials hit the jobsite. Avoid problems by proactively managing delivery logistics.
Checklist for smooth material delivery:
Confirm with the vendor 1–2 days prior
Notify the site super of what’s coming and when
Ensure unloading tools/equipment are ready
Inspect materials for damage or missing items
Get a signed delivery ticket with every drop
🧠 Efficiency tip: Staging materials too early creates clutter and safety risks. Deliver just-in-time whenever possible.
📚 Step 6: Reconcile Invoices and Track Performance
Once materials arrive and work begins, don’t let paperwork slide.
Reconcile delivery with the PO – Did what you ordered match what you received?
Check the vendor’s invoice – Does it match the quote? Are any fees unexpected?
File all records – Keep everything attached to the original RFQ and PO in one place.
Rate the vendor – Timeliness, accuracy, and service level should all be documented.
📌 Professionalism tip: Good contractors build long-term vendor relationships—but only if there’s accountability on both sides.
🧠 Final Thoughts: Procurement as a Competitive Advantage
Procurement isn’t just buying things. It’s a system that can either power your project—or sink it.
When done right:
Projects flow smoother
Fewer delays occur
Margins improve
Clients trust you more
But when handled manually—across spreadsheets, texts, and scattered inboxes—it becomes a constant fire drill.
That’s why we built ConstructX: to bring structure, automation, and simplicity to procurement, without disrupting how contractors already work. From automated RFQs to streamlined quote comparisons and centralized PO tracking—we’re helping teams modernize one jobsite at a time.
📨 Want a smarter way to manage procurement?
Book a demo by emailing us: info@constructx.ai